
Table Of Contents
- Introduction
- Editing Palette
- Landscape Mode
- Troops mode
- Buildings Mode
- Sound Mode
- Extra Features Mode
- Region mode
- Editing the Map Type
- Mission Editor
- Event Editor
- Triggers
- Actions
This guide will take you through the basics of how to create a user created map; from creating the landscape and the tools available to do so, to adding mission and events to make your maps truly challenging to other players. By following the steps in this guide in the order they are presented, you should be able to build maps to your exact specification.
How to create a map
Regardless of what sort of map you are trying to create, there are 5 basic steps you will work through, which are
- Creating a New Map
- Editing the Landscape
- Editing the map type
- Creating Missions and Objectives (Custom and Freebuild Maps only)
- Adding events (optional)
Each stage will be discussed in this order in this guide.
CREATING A NEW MAP
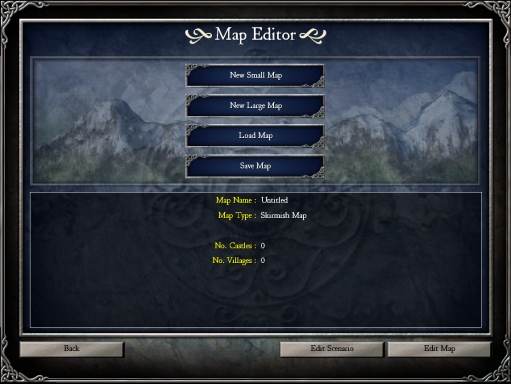
To begin a new map, click the “New Small Map” or “New Large Map” button (depending on the size of map you
wish to
build). If you had a previous map loaded, you will be prompted whether you want to continue if you have not
saved
your previous map. By clicking one of these buttons, any previous created map will be cleared and the editor
will
start afresh.
It may be a good idea to save your map now, so as to give it a name and space in your save list.
Once you are ready to begin designing your map, click “Edit map”. This will bring you to the landscape
editor.
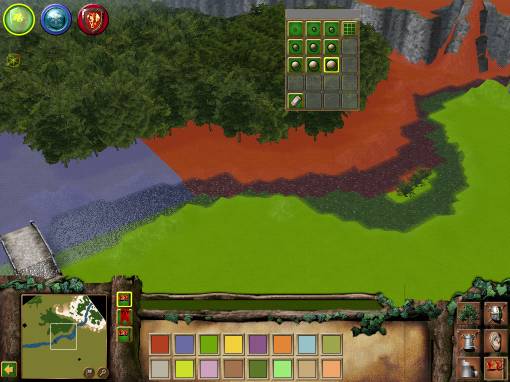
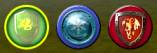 - these icons allow you to choose the
alignment interface. Changing the alignment interface allows you to edit the map in accordance with the
selected
alignment. In order to change, just click on the relevant icon for the alignment you desire; these are, from
left
to right; Good, Ice, Evil. (Changing estate alignment's is explained in Section 7)
- these icons allow you to choose the
alignment interface. Changing the alignment interface allows you to edit the map in accordance with the
selected
alignment. In order to change, just click on the relevant icon for the alignment you desire; these are, from
left
to right; Good, Ice, Evil. (Changing estate alignment's is explained in Section 7)
![]() - this icon is the all erase tool.
- this icon is the all erase tool.
![]() - this icon allows you to erase only the
selected type of landscape/troop type etc that you are currently editing.
- this icon allows you to erase only the
selected type of landscape/troop type etc that you are currently editing.
 - these icons select your brush size.
![]() - this icon toggles gridlines on the
landscape.
- this icon toggles gridlines on the
landscape.
![]() - this shows the direction you are facing
on
the map.
- this shows the direction you are facing
on
the map.
![]() - this button brings you back to the
editor
main menu.
- this button brings you back to the
editor
main menu.
 - this is your mini-map. The flag button
displays estate colours on the mini-map, the magnifying glass cycles through the different zoom levels for
the
mini-map.
- this is your mini-map. The flag button
displays estate colours on the mini-map, the magnifying glass cycles through the different zoom levels for
the
mini-map.
![]() - These are the editing tool menus, and are explained further in
the next section of
the guide.
- These are the editing tool menus, and are explained further in
the next section of
the guide.

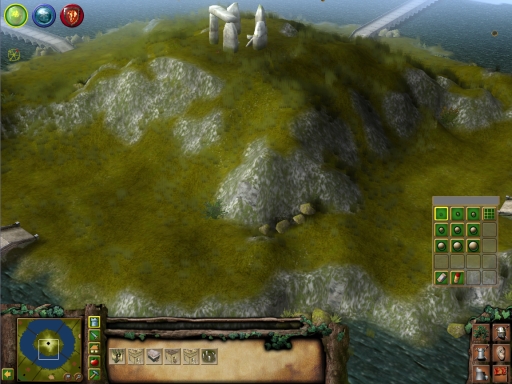
This mode is used for editing the terrain textures, heights, type and everything else to do with the terrain.
![]()
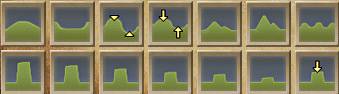
Land Height Tools
Use these tools to alter the lay of the land. Remember that by choosing a different mouse pointer size, you
can
affect more or less land. (see section 2)
The top row, from left to right; these icons are-
· Raise land
· Lower land
· Level uneven land
· Smooth uneven land
· Raise rounded piece of land
· Raise sharp mountain
· Raise small hills
The bottom row icons will raise or lower land to a specific height instantly, from the tallest possible (far
left) to the lowest possible (far-right). Doing this can be made easier ion architect view (pressing
Spacebar) and
will create solid square cliffs rather than rounded hills.

TIP: To create a smooth slope, start with a section as high as you want, then create small heights going
down
to where you want the bottom of your slope to be, then use the “Level uneven land” and “Smooth uneven
land”
tools.
![]()
Land Textures, Tints and Shades
This mode is used to edit the textures of the landscape.
![]() - this icon displays the available textures; the
icon
and textures will change to coincide with the selected alignment (See Section 2)
- this icon displays the available textures; the
icon
and textures will change to coincide with the selected alignment (See Section 2)
![]()
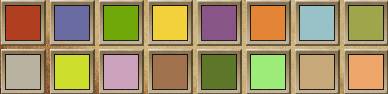
These are the available land textures. Selecting one (highlighted in yellow) will allow you to edit the landscape to that chosen texture. Each alignment has 9 unique land textures. To change the alignment used, click on the relevant icon in the top of the Land editor interface (See Section 2)
![]() - this icon displays the available tints and shades
tools.
- this icon displays the available tints and shades
tools.
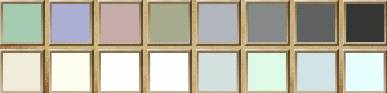
The top row shows the available tints for the land textures.
The bottom row is the available shades for the land textures.
Note: Any map tile can have both one tint and one shaded applied to it at the same time.
![]() - this icon will allow you to delete any
edited tints and shades and restore to them to the default of the underlying texture.
- this icon will allow you to delete any
edited tints and shades and restore to them to the default of the underlying texture.
TIP: By using various textures with the various tints and shades available, some truly unique landscapes
can
be created making the choices for your map almost limitless!
![]()
Seas and Rivers tools
These tools allow you to edit the landscape to being a type of water, either sea or river. It will also allow other water related things such as adding waterfalls to the sides of cliffs, editing the direction of water flow and more.

These icons do the following; from left to right:
· Place River
· Change River Flow Direction
· Add Ripples
· Create Waterfall
· Place Sea
· Change Sea Flow Direction
· Add Waves
· Place Marsh
These icons do the following; from left to right:
· Place Bridge
· Place Wave Crashing Effect
· Place Small White Water
· Place Large White Water
· Place Fog
![]()
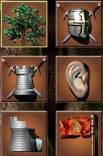
Landscape Features
Use this tool to add various features to your landscape including trees, rocks and even essential resources like Iron and Stone.
These features will change in accordance with the selected alignment (See Section 2). Each alignment has 18 different available features.
![]()
The top row has 11 different available shrubs and bushes features. These are purely for landscape and are not used as resources.
![]()
The bottom row has 7 different features. These are, from left to right;
· Forest
· Tree type 1
· Tree type 2
· Mossy Rocks
· Iron (The resource used in the game)
· Iron Rocks
· Stone (The resource used in the game)
The two individual tree types can also be used as the resource for wood on your map. The Iron and Stone features can also be used for the relevant resources. So remember, if you want all resources to be available to the player, be sure and place these three features on the map.
![]()
Animals
This tool is used to place wildlife on your map. There are three types of wildlife available;
![]()
Wolves, Crows and Seagulls.
These three animal types remain the same for each alignment. Animals may only be placed in certain places in the map. Seagulls must be placed over sea, wolves must be placed on land and crows must be placed in trees.

This mode is used to place different units and siege equipment on your map.
When in Troops mode, an additional set of icons is displayed for your cursor type in the form of different coloured shields.
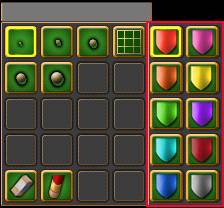
These shields are used to select which player colour the troops will be for. The Colour selected means the troops will be used by the player or opponent of the corresponding colour.
![]()
Standard Units
This allows you to place units which can be used by any alignment.
![]()
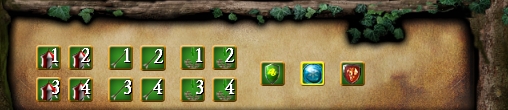
The available standard units are; from left to right:
· Men-At-Arms
· Archers
· Crossbowmen
· Macemen
· Pikemen
· Swordsmen
· Knights
![]()
![]()
![]()
Special Units
These are units specific to each alignment.
-The Arthur Units available are; from left to right:
![]()
· King Arthur (Lord)
· Merlin
· Sir Bedivere
· Sir Galahad
· Sir Gareth
· Sir Percival
· Sir Gawain
· Sir Lancelot
· Green Dragon
- The Evil Units available are; from left to right:
![]()
· Vlad (Lord)
· Saxon Warrior
· Fiery Imp
· Black Dog
· Creeper
· Werewolf
· Black Dragon
· Giant Demonic Bat
· Sorcerer
· Saxon Warlord
- The Ice Units available are; from left to
right:
![]()
· Dietrich (Lord)
· Siegfried
· Ice Dwarf
· Ice Queen
· Ice Maiden
· Polar Bear
· Ice Giant
· Ice Wolf
· White Witch
· Ice Dragon
![]()
Siege Equipment
This allows you to place different siege equipment on the map. Although in-game some siege engines should only be available to certain alignments, all siege engines are made available in this menu allowing the map creator extra flexibility.
-The siege engines available to place are; from left to right:
![]()
· Laddermen
· Catapult
· Ballista
· Trebuchet
· Battering Ram
· Siege Tower
· Mantlet
· Cat
· Fire cart
· Stake Hurler
· Enchanted Orb
· Werewolf Launcher

This mode is used to add the different types of buildings to the map in the same way that they are used in game.
The selected alignment will only affect the special units buildings to correspond with the selected alignment, or change the texture of the buildings to correspond with the selected alignment. All other buildings, regardless of if they are alignment specific, are included.
![]()
Castle Buildings
These are the buildings which make up the structure of your castle. They are; from left to right:
![]()
· Single Wall
· Double Wall
· Triple Wall
· Stairs
· Gatehouse
· Lookout Tower
· Tower
· Engine Tower
· Engineer's Guild
![]()
Military Buildings
These are the military style buildings that make up parts of your keep. They are; from left to right:

· Round Table/Ice Tower/Sorcerer's Tower (Dependent on Alignment)
· Barracks
· Armoury
· Siege Camp
· Brazier
· Pitch Ditch
· Rolling Logs
· Tower Mounted Mangonel
· Oil Tipper
· Moat
![]()
Civilian Buildings
These are the buildings used by civilians for entertainment and the likes. They are, from left to
right:
![]()
· Hovel
· Statue
· Statue (alternate)
· Well
· Church
![]()
Food Buildings
These are the various food resource buildings and Royal food types available. They are; from left to right,
and
top to bottom:

· Granary
· Castle Kitchen (Pantry)
· Hops Farm
· Brewery
· Inn
· Apple Farm
· Dairy Farm
· Wheat Farm
· Mill
· Bakery
· Pig Farm
· Winery
· Vegetable Garden
· Chicken Farm
· Eel Farm
· Seal Holes
![]()
Industry Buildings
These are the various industry buildings available for in game. They are; from left to right:

· Stockpile
· Wood Camp
· Stone Quarry
· Iron Mine
· Ox Tether
· Poleturner's Workshop
· Fletcher's Workshop
· Blacksmith's Workshop
· Tanner's Workshop
· Armourer's Workshop
· Pitch Rig
· Carter's Post
· Chandler's Workshop

6 Sound Mode
This mode is used to add sounds to different areas of the maps. Sounds are added the same way as a texture,
just
place it on the map where you would like the selected sound to be heard.
There is only 1 sub-section and tool type, which is to add different types of sounds. The available sounds
are;
from left to right and top to bottom:

· Sea flow
· Waves
· Small river flow
· Large river flow
· Waterfall
· Wind in crops
· Crops
· Loud birds
· Quiet birds
· Insects
· Amphibians/Frogs
· Village

7 Extra Features Mode
This mode allows you to add other items to the landscape. There are 3 different sub-sections.
![]()
Keeps and Flags
This section is very important. In order to set the starting position of the players or estates, you need to
place
different buildings from this menu. The building types are, from left to right:
![]()
· Castle Estate Keep (varies with alignment)
· Small Village Hall
· Medium Village Hall
· Large Village Hall
· Stone Circle
To make an estate into a playable castle estate for a player or AI opponent, a Castle Estate Keep must be placed in an estate. For ANY map type, at least one of these must be placed on the map. Between 1 and 4 of these can be placed on the map. However many are placed determines how many players can be assigned to the map. If, when playing, a player or AI opponent is not assigned to an estate, the estate will become a village and a village hall will appear in the place of the keep.
For a King of the Hill map, only 1 village estate can be created with a stone circle, which will be the estate that is to be captured in order to win.
For a Capture the Flag map, 1 or more estates must be made with a stone circle placed within them. These estates will become the ones which must be captured in order to win.
More information on allocating estates to create Skirmish, Custom of Freebuild Maps can be found in Section 8.
To create a village estate, one of the various Village Halls must be placed in an estate. Any number of
these can
be placed on your map.
Estate Alignment Setup and AI Helpers
Once a keep, village hall of stone circle is placed, it can then be clicked on to bring up this panel in the
interface…
This panel is used for setting the chosen estates alignment and setting up AI helpers for that estate.
![]()
The three alignment icons can be clicked on to change that estate and all its surrounding landscape within
the
region into the chosen alignment. This will change all buildings, trees, textures, features etc to the
chosen
alignment, and by default, the map will start with the estate in this alignment. This can be done with both
villages and castle estates. Only neutral estates will appear as the alignment they were designed as in the
map
editor by using these icons. Once a village or castle estate is occupied by a player, they estate will turn
into
that alignment.
Note: Once an estate is changed into an alignment, buildings, troops and other features can only be
placed in
that estate in the map editor if the correct alignment is chosen using the alignment icons in the top
left of
the screen (See Section 2)

These icons are AI helpers. By placing these icons around an estate, it will give any AI opponents or allies
a
helping hand on where to place certain troops and siege equipment when attacking a castle or village. The AI
will
always try to use these guides when attacking as long as they have access to them. This can be used
effectively in
custom maps when trying to setup the AI to attack the player with sieges.
There are 3 types of helpers, and 4 helpers 4 each type can be placed around the estate. The types of helpers
are
![]() - these give the AI help in where to set
up a
siege camp.
- these give the AI help in where to set
up a
siege camp.
![]() - these will help the AI with where to
effectively place missile troops such as archers and crossbowmen.
- these will help the AI with where to
effectively place missile troops such as archers and crossbowmen.
![]() - these help the AI with where to attack
effectively using siege engines such as catapults and trebuchets.
- these help the AI with where to attack
effectively using siege engines such as catapults and trebuchets.
![]()
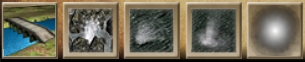
Ruins
This tool lets you place various different types of castle ruins on the map.
![]()
![]()
Miscellaneous Features
This allows you to add various other elements to your map to make it that little bit more interesting. These
act
much like ruins though some more purpose, as they can be used as objectives for missions in Custom and
Freebuild
maps. They are; from left to right:
![]()
· Signpost
· Gatehouse footprint (can be clicked on in game to build a gatehouse for the required amount of
stone.)
· Tower footprint (can be clicked on in game by a player to build a tower for the required amount of
stone.)
· Bandit camp (will spawn outlaws who may attack your keep and/or villages.)
· Werewolf Pit (will spawn werewolves who may attack your keep and/or villages.)
· Dragon Nest (places a fire-breathing dragon who will attack anything that approaches.)
· Ice Wall
· Holy Grail (A tomb containing the fabled cup)
· Dietrich's Cage (a cage in which the ice prince Dietrich is imprisoned.)

8 Region Mode
This mode allows us to create separate estates on our maps as well as some other features such as adding
invasion
markers as well.
![]()
Estate Setup
This is used to set up the different estate regions and borders on your map. These are essential to creating
a
good balanced map.
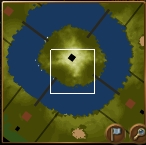
The user is presented with a variety of colours.
Each colour represents a different estate which can be added to the map.
Also note that while in this mode, the landscape itself will change colour to represent which estate the land
we
are over currently is.
Here we can see the landscape has turned 3 different bright colours. This means that land from three different estates is displayed. Where 2 different colours meet, this forms the borders of the estates.
To create an estate, simply click on a colour and paint the land a different colour from what it already is. The area of land that is a certain colour will be one estate; lands of different colours will form different estates.
Note: Remember we can also turn on estate colours on the mini-map by clicking on the flag icon (See Section 2)
![]() -
Waypoints
-
Waypoints
With this tool we are given 4 different coloured flags.
![]()
These can be placed on the map to set markers for events in your missions. Upto 8 flags can be placed in each
colour, use the mouse wheel to cycle through the numbers.
These flags are used to place positions for invasions and reinforcements in custom maps. This will be
explained
more in section 10.
TIP: Once you have finished the landscape for your map and clicked the ![]() button, it would be advisable to save your map and so avoid losing the
landscape you have created and having to do it all over again!
button, it would be advisable to save your map and so avoid losing the
landscape you have created and having to do it all over again!
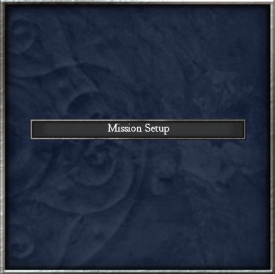
Once you have your map's landscape crated it is time to move on setting up your map to the type you want it to be. In order to do this, you have to click on the 'Edit Scenario' button from the New Map panel:
This will bring you to the edit map type panel, which has various options and features.
For all types of maps, we can set the starting date of our map by clicking on the button below the mini-map to edit the month and typing in the text box to change the year. The year can be set to a number between 700 and 1200.
Asides from setting the date (not essential), the first part of this you will have to deal with is choosing
your
map type, done by using the three buttons along the top of the panel, highlighted here in red:
There are 3 types of map we can create: Skirmish, Custom Map and Freebuild Map.
Creating a Skirmish Map
A Skirmish map is an instant battle map to be used by the player against AI opponents or as a multiplayer
map.
These maps have no mission objectives, but the map can be set up to one of three types, a normal skirmish
map (can
be used for Custom Skirmish or Multiplayer), King of the Hill or Capture the Estates map (these two can only
be
used in multiplayer mode). To change the type, simply click on the map type you wish it to be in the
Scenario
Editor screen (see below).
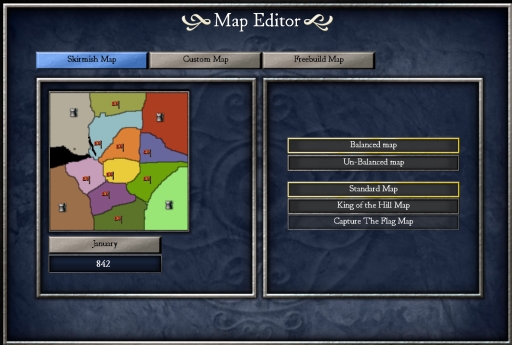
Here we can also assign the map as Balanced (all players have equal space and resources) or Un-balanced
(some
players have advantages over the others).
Creating a Standard Skirmish Map
For a Normal Skirmish Map, the following is required:
· Between 2 and 4 Castle Estates
The number of Castle Estates Placed on the map determines the number of players available for this map; for example, 2 Castle Estates implies 2 players. These players can be AI Opponents (Custom Skirmish and Multiplayer) or another Stronghold Legends player connected through Multiplayer. The estates will change alignment in correspondence with whatever alignment the player/opponent chooses.
Village estates and neutral estates can also be placed, but are not required in order to create the map.
Creating a King of the Hill Multiplayer Map
For a King of the Hill map, the following is required:
· Between 2 and 4 Castle Estates
· At least one village estate..
The castle Estates will act as the estates used by the players or AI opponents in the same way as a Normal
Skirmish map. However, at least 1 Village Estate must be placed. This estate will then be shown in the
scenario
editor with a large castle icon on it. This estate will become the village that is to be captured in order
to win.
In game, the village will contain a stone circle with a glowing orb above it. This estate will be the estate
that
must be captured by a player in order to achieve Victory.
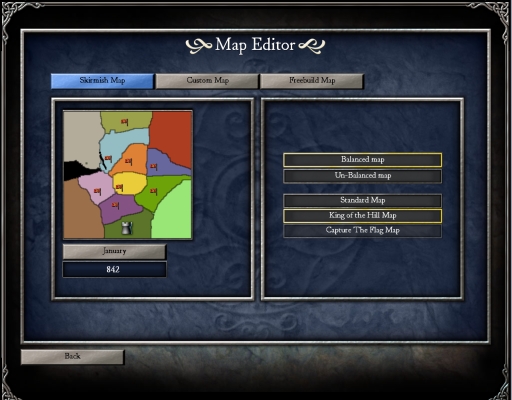
The 4 corner estates without icons are the player estates. The central estates with small red flags are villages.. The Village estate with the castle icon is the estate which needs to be captured by the players. This can be changed to another estate by simply clicking on the tower first, then clicking on another village estate flag; for example, to change the need to be captured estate in this, we click on the tower then click on any of the the red village flags and the estates will swap types.
Creating 'a Capture the Flag' Multiplayer Map
For a 'Capture the Flag' type map, the following is required:
· Between 2 and 4 Castle Estates
· 1 or more Estates with Stone Circles.
Like with any Skirmish style map, the number of Castle Estates placed will determine the number of available players.
The estates with Stone Circles will act as the estates which need to be captured by the players in order to achieve victory. All estates must be captured in order to win, so the only way to edit how many need to be captured is to add or delete Stone Circles from estates through editing the map's landscape (See Section 2)
Village estates can also be placed on the map and will act in the same way as they do in a normal Skirmish Map.
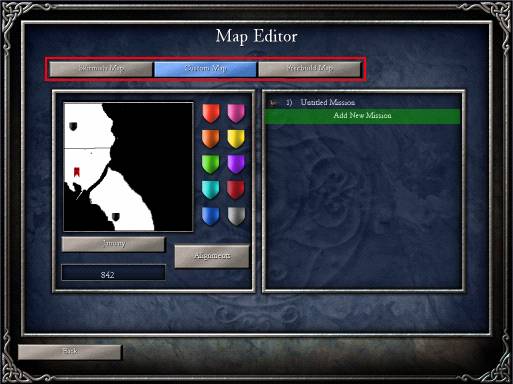
Creating a Custom Map
A Custom map is a mission style map, much like a mission from the Stronghold Legends campaign. These are
played
through the “User Maps” section of the Stronghold Legends Single Player Mode. Custom Maps cannot be used for
multiplayer. The map is created with missions, objectives, Enemies and available buildings and trade etc.
To create a Custom Map, the following is required.
· At least 1 Castle Estate
· Anything required for your missions must be placed on the map.
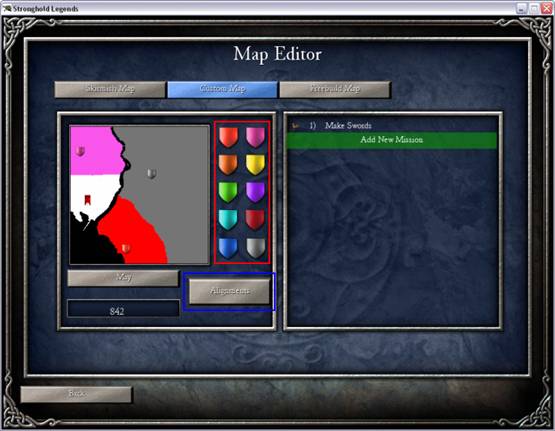
Once you have your map set up so that everything is included, you need to assign a colour to each estate; this determines which estates each player will start off with. This is done by clicking on a flag colour (highlighted here in red) then assigning it to an estate by clicking on one on the mini-map. To change which colour will apply to which lord (be it human or AI), we need to click on the alignments button (highlighted here in blue). This will allow you to select which estates will be neutral, used for reinforcement and which castle estate will be the human player, or which lord the enemy estates will be.
These alignments are also used later on when creating invasions and other events (See Section 11) because each colour represents a different “player” on the map. Also, any troops placed on the map through the map editor will have to be in one of these colours, and these will determine which army/alignment they are fighting for.
Note: Setup your alignment and note them down so that when placing troops on your custom map, you know for sure which colour you want them to be!
Creating a Freebuild Map
A Freebuild map is one with a simple mission setup that does not require enemies and allow the player to
build
peacefully on the map. It may also include some economic objectives. This is much like a Custom Map, only
without
the enemy lords and military side of it all.
Building a Freebuild map requires:
· At least 1 Castle Estate
You setup the Freebuild map by allocating the player colour (red) to the estate which you want the player to use as their castle estate. This is done the same way as assigning colour's to estates in a Custom map; click on the red shield then click on the estate you wish the player to be able to build in.
This section will teach you how to set up a mission's structure for both your Freebuild and Custom Maps.
The mission setup panel is located in the Edit Mission Type panel when you click on the Custom Map/Freebuild button. It is located in the box on the right of the screen.
|
CUSTOM MISSION SETUP |
FREEBUILD MISSION SETUP |
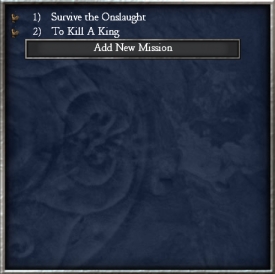
Here you can edit existing missions and events, Add new missions and events and delete already existing missions and events.
Note: For a Freebuild map, there are no missions.The mission setup is simply used to determine the players starting goods and, building, resources and trade availability and add a briefing. This means that the player can build on the map without having to do anything or achieve any goals. However, this cannot be done with a Custom Map.
· To delete an already existing mission, click on the little boot icon next to the mission you want to
delete.
· To edit an already existing mission, click on the mission you want to edit. This will bring up the edit
mission
and events screen.
· To add a new mission, simply click on “Add New Mission”. This will add an “Untitled Mission” under your
previously existing missions. To edit this new mission, simply click on it.
The edit mission screen presents us with a variety of options.
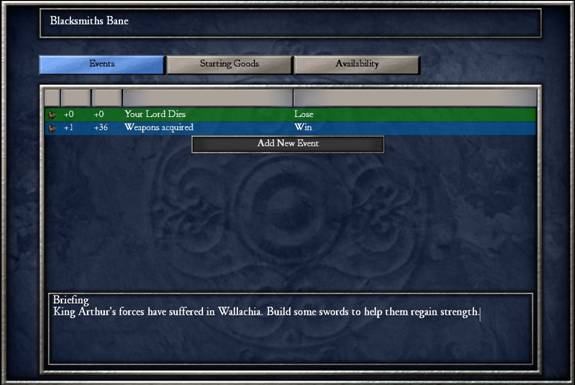
Through this we can:
· Edit existing Win/Lose conditions and events that happen in the mission
· Add a mission briefing
· Rename the mission title
· Edit the starting goods and resources for the mission
· Edit what goods and resources can be traded during the mission
· Adjust which buildings will be available to the user during the mission
The event editor will be explained more in the next section (Section 11) so now lets have a look at the other two sections.
Starting Goods
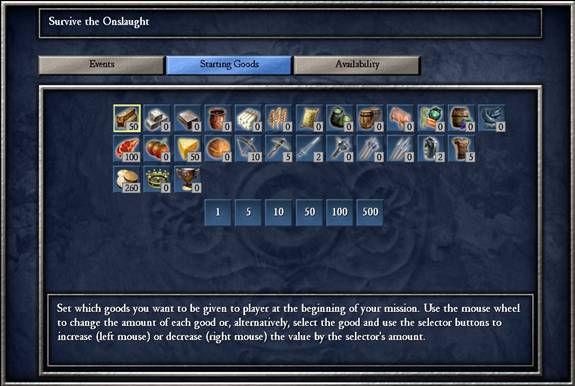
Here we set up which goods and how much of these goods the player will start the mission with. Goods set to zero means that the player will start of with none of that resource/good.
The goods amounts can be changed in two ways. We can hover over the good and scroll up and down on the mouse wheel to change the value. Alternatively, we can select the good by left clicking on it then clicking on one of the number values below the goods. Left clicking on a number will increase the goods value by that amount and right clicking on the number will decrease the goods value by that amount.
If setting up multiple missions, only set the starting goods for the first mission. For concurrent missions, keep the starting goods set to zero if you want the player to start the mission with the goods that he ended the first mission with. If you want to add to this number, then set Starting Goods for concurrent missions to add that amount to what the user ended the previous mission with.
Availability:
In availability there are three sub sections; Trade, Build and Units. Each of these has its own screens so
we will
go through all three respectively.
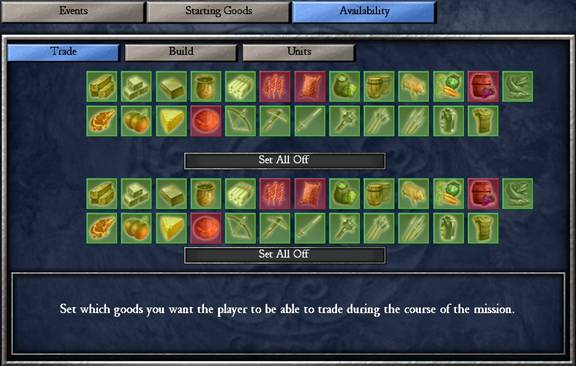
In trade availability we set which goods the player is able to trade for that mission. The goods at the top of the screen represent the goods the user is able to buy, and the bottom is used for which goods the player is able to sell. Goods in red the user will not be able to buy/sell and goods in green the user will be able to buy/sell. There is also a set all off/on button to set all goods in buy or sell on or off.
In build availability, we set which game buildings and structures the player will be allowed to build for that mission. As with trade, red means the user will not be able to build that building/structure and green means the user will be able to build that building/structure, and a Set All Off/On button is available.
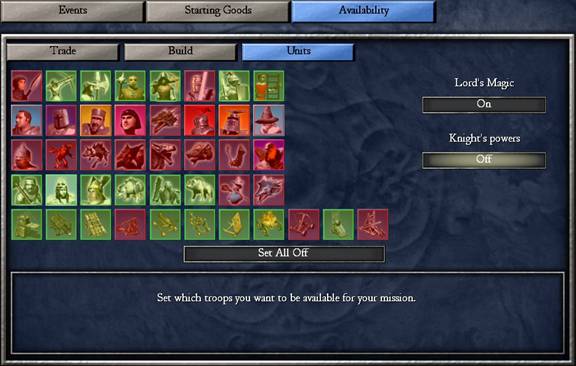
In unit availability, we can set which troops, special troops and siege engines the player will be able to
create
in that mission. Obviously, the player will need the respective buildings placed in order to build the unit
types.
This works in the same way as trade and building availability, red meaning not available and green meaning
available with a Set All Off/On button available to use.
In this section we can also set the Lord's Magic ability and Knight's powers to On/Off/One Shot. This means
that
the player's and AI Lords or Arthur's Knights will be able to use their power when it is charged (On), Not
be able
to use their power at all during the mission (Off) or only use their power once throughout the mission (One
Shot).
Notice that neither of these, however, affect Merlin/The Ice Queen/The Sorcerer's magical powers, as these
will
always be available to use provided the player has the unit, regardless if either of these are set to
On/Off/One
Shot.
11. EVENT EDITOR
Each mission will contain a variety of events. To start off with a basic example, each mission there needs
to be a
Win and a Lose condition. This means that there must be 2 events in each mission, 1 must have the action
“Win” and
the other “Lose”.
To do this we must click on a mission to bring us to the events screen.
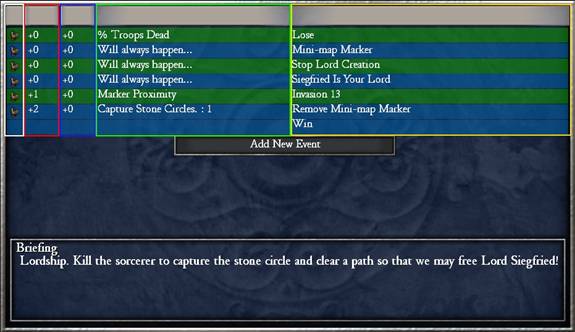
The event editor lists all the events attributes like this.
- Delete event button (white box)
- Date (red box)
- Delay (blue box)
- Trigger(s) (Green box)
- Action(s) (Yellow Box)
Click on one of the events to edit it or click “Add New Event” to bring us to the Event Editor.
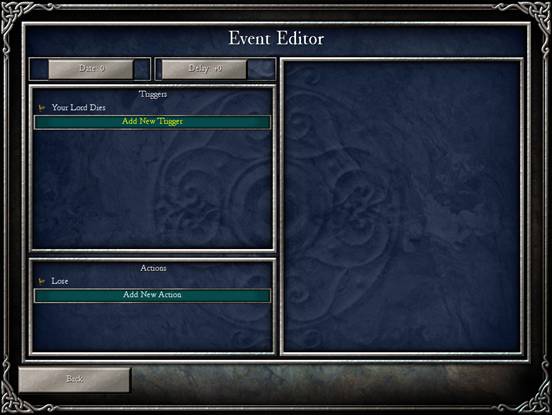
To set something as a Win/Lose condition, in the actions box, click “Add New Action” (if there is not already an action there). Select either Win/Lose from the list presented.
Once you have this selected this, click on “Add New Trigger” (if there is not already a trigger present) and select the trigger that will cause the player to Win or Lose the mission depending on which action you selected for this trigger.
A good example is to select “Lose” for your action and then “Your Lord Dies” for a trigger. This means that when the map is played, if the player's Lord is killed, then the player will lose the mission.
Setting up any event in a Custom Map mission requires an “Action” and a “Trigger”, as we have just seen in the example of setting a Win and Lose condition for your map.. If the Trigger is left blank, then the trigger will read “Will Always Happen”. This can be used to set up something which will happen straight away or after a certain period of time without any other conditions needing to be met.
An event can have a number of triggers and a number of actions. In an event with multiple triggers, each trigger must be met before the action(s) occur; as with events with multiple actions, where once all triggers have been met, all the listed Actions for that event will occur.
If you want to set a single action with a single trigger, then this will have to be placed in a separate event, rather than in an existing event, since all triggers will have to be met before the action(s) occur.
Date and Delay:
There is also two methods of controlling the time certain events will happen. These are called Date and
Delay.

Both of these values are edited using the mouse wheel. Hold your cursor over the button and scroll the mouse wheel up to increase the value and down to decrease the value or alternatively by clicking on the buttons themselves; left-click to increase by 1 or right-click to decrease by 1. The values in both counters represent months in game.
The date value determines at which date the game will begin to check if the trigger of the event has been met. For example if the Mission begins in Jan 894, the event is “All Enemy Lords Dead - Win” and the date value is set to 3, then the mission will not be winnable until March 894, meaning that if all Enemy Lords are killed before that date, then the mission will not end until it reaches that date.
The delay value puts a delay of a number of game months after a trigger has been met before the action of the event occurs. For example, if the event trigger is “Marker Proximity” and the action is an Invasion and the delay is set to 2, then the invasion will not come on the map until 2 months after the user has come within the marker's proximity.
For Win/Lose conditions it is probably best to set the date to zero, so that the player is able to Win/Lose
the
mission right from the very start of the mission. Although you may like to set a small delay of maybe 1
month to a
Win condition so that they have to wait a small while after the player has achieved their goal before they
are
finally presented with Victory, though this is entirely at your discretion, and setting the delay to zero
will
Win/Lose the mission the instant the trigger is met.
Note: If setting a delay on a Win/Lose condition, make sure it is very low (1 or 2 months maximum is
recommended), or else the player will have to wait for a great length of time after meeting a trigger
before
being told they are Victorious or have been defeated, and it will make the mission appear broken.
The date can be used to set up actions that will occur after a certain time. By leaving the trigger blank it will say “Will Always Happen…”. If you set a date on this, then the action will be performed after that date has passed without any other triggers needing to be met. This is good for things such as invasions or sending reinforcements etc.
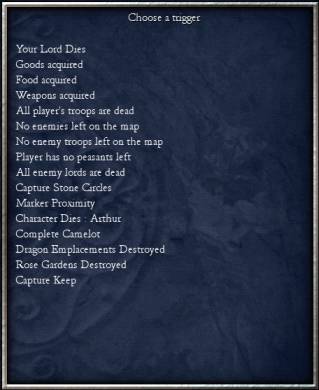
Triggers:
A trigger is something which must be met in order to cause an action to occur. These range from simple
triggers
such as the player's Lord dying, to more complex triggers such as a certain game character being within
range of a
certain point of the map. There are many triggers available to setup in the Stronghold Legends map editor.
These
will now all be fully explained in order.
Your Lord Dies
This trigger means that if the player's Lord dies during the course of the mission, then it will trigger an
action. This is typically used for a Lose trigger. There is nothing to setup for this trigger.
Goods acquired
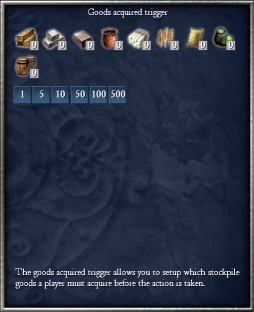
This trigger means that once the player has reached a certain amount of stockpile goods, the selected action will be triggered. The amount of each good is set using the mouse wheel or by clicking on the number buttons provided, left click to increase and right click to decrease by the button's amount.
Food acquired
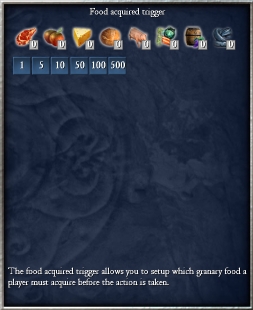
This trigger means that once the player has reached a certain amount of granary or Lord's Kitchen items, the
selected action will be triggered. The amount of each item is set using the mouse wheel or by clicking on
the
number buttons provided, left click to increase and right click to decrease by the button's amount.
Weapons acquired
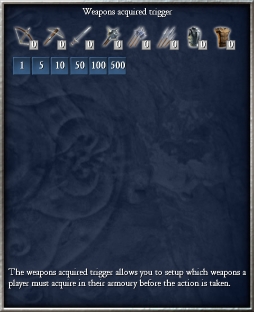
This trigger means that once the player has reached a certain amount of weapons, the selected action will be
triggered. The amount of each item is set using the mouse wheel or by clicking on the number buttons
provided,
left click to increase and right click to decrease by the button's amount.
All player's troops are dead
This trigger means that if all the player's troops are killed, not including the player's Lord, then the
selected
action will be occur.
No enemies left on the map
This trigger means once all the player's enemies, including enemy Lords, have been eliminated from the map
the
selected actions will happen.
No enemy troops left on the map.
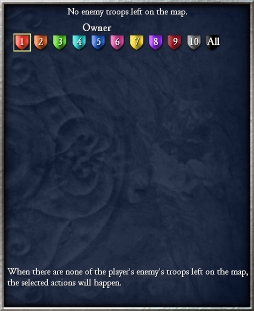
This trigger means that once all of an enemy's troops, not including Lords, have been killed, then the
selected
action will occur. The enemy whose troops this corresponds to is selected using one of the 10 colours of
shields
(each enemy is setup with a colour in the Custom mission setup, see Section 9),
or it
can mean all enemy troops by selecting the black “All” shield.
Player has no peasants left
Once the player has no more peasants available, the selected actions will occur. There is nothing to setup
for
this trigger.
% Troops Dead
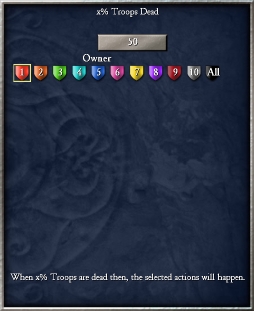
When a percentage of troops of a player in the mission are dead, the selected action will occur. The
percentage is
setup by clicking on the grey number button (left click to increase and right click to decrease) or by using
the
mouse wheel when hovered over this button. The player/character whose troops need to be killed for the
trigger to
occur is selected using the 10 coloured shields or the black ALL shield for all the players on the map.
All enemy Lords are dead
Once all the enemy Lord's on the map are dead, the selected action will occur. There is nothing to setup for
this
trigger.
Capture Stone Circles.
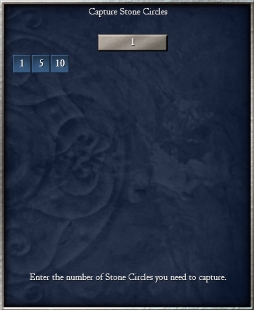
Once the selected amount of stone circles on the map have been captured by the player, the selected action
will
occur. The amount of stone circles is set using the mouse wheel while hovered over the grey number button,
by
using the number buttons provided (left-click to increase, right-click to decrease by the selected amount)
or by
clicking on the grey number button (left-click to increase, right-click to decrease by 1).
Marker Proximity
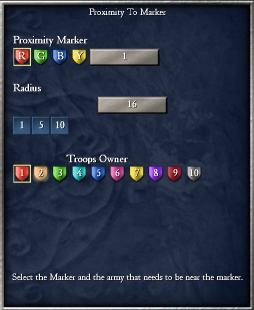
This trigger means that once a character's troops are within a certain distance of an area of the map, the
selected action will occur.
Character Marker Proximity : Character
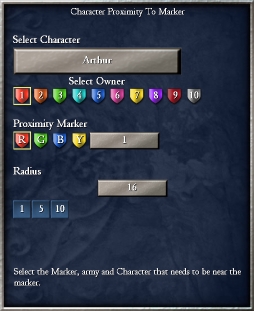
This trigger is the same as the Marker Proximity trigger except for the fact that a specific unit has to be
within
range of the marker for the trigger to occur. The character is selected by clicking on the grey character
button
to scroll through available character's (Arthur, Dietrich, Vlad, Lancelot, Hildebrand, Mordred, Siegfried,
Sir
Bedivere, Merlin, Gareth, Galahad, Gawain, Bors, Percival, Schilbung, Niebelung, Orkis, Janibas, Radu). Then
which
player's troops need to be within the radius is set using the 10 coloured flags. The area of the map is
selected
using a marker (a coloured flag set on the game map, see Section 8/Waypoints). Then
the
radius around the marker which the player's troops need to be in range of is set. The lower the radius, the
closer
the troops need to be for the trigger to occur and vice versa. This radius amount represents game tiles. The
radius is set using the mouse wheel while hovered over the grey number button, by using the number buttons
provided (left-click to increase, right-click to decrease by the selected amount) or by clicking on the grey
number button (left-click to increase by 1, right-click to decrease by 1).
Character Dies: Character
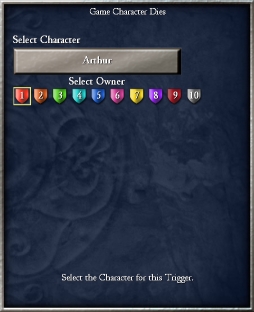
In this trigger if a certain character from a certain player dies, then the selected action will occur. The
character is selected by clicking on the grey character button to scroll through available character's
(Arthur,
Dietrich, Vlad, Lancelot, Hildebrand, Mordred, Siegfried, Sir Bedivere, Merlin, Gareth, Galahad, Gawain,
Bors,
Percival, Schilbung, Niebelung, Orkis, Janibas, Radu). Then which player's troops need to be within the
radius is
set using the 10 coloured flags.
Complete Camelot.
This means that if Camelot is complete (the player's castle is enclosed) then the selected action will
occur. This
would typically be setup with a date on the trigger so that the player is given a time limit in which to
build
their castle before the action occurs.
Camelot Not Complete.
This means that if Camelot is not complete (the player's castle is not enclosed) then the selected action
will
occur. This would typically be setup with a date on the trigger so that the player is given a time limit in
which
to build their castle before the action occurs.
Dragon Nests Destroyed
This trigger means that once all dragon's nests on the map are destroyed, the selected action will occur.
There is
nothing else to setup for this mission.
Rose Gardens Destroyed
This trigger means that once all rose gardens on the map are destroyed, the selected action will occur.
There is
nothing else to setup for this mission.
Capture Keep.

Once a keep is captured, the selected action will occur. Which keep the trigger corresponds to is determined
by
placing a marker in that keep's estate then setting the trigger to that marker (a coloured flag set on the
game
map, see Section 8/Waypoints).
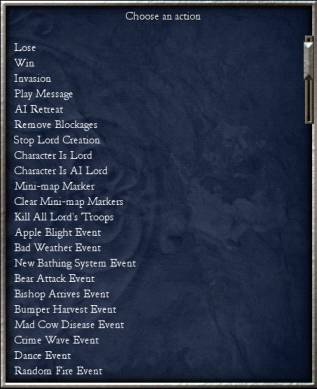
Actions
Actions are situations that occur on a map at periodic times or once certain things happen within the
mission.
These are things such as achieving Victory or being Defeated, to large enemy invasions coming on to the map
to
attack your castle. These are coupled with triggers to create unique missions and events.
Actions occur once the date of the event has been reached, once all the triggers have been met and after the delay of the event has passed.
Note: Some actions will say “There is nothing to setup for this action.” Which means there is no unique parts of the action to set up, but they should be setup with a trigger or else the actions will simply occur once the date of the event is reached. An example is with the Win, though there is nothing to setup for the action, if an event has an action Win, a date of 0 and no triggers, then as soon as the mission is started, the player will achieve victory. This is because a trigger has to be created to decide what must be done for the player to achieve victory.
Lose
This action means that the player will be defeated in their current mission and will have to restart and try
again. There is nothing to setup for this action.
Win
This action is used to achieve Victory in the player's current mission once the associated triggers have
been met.
There is nothing to setup for this action.
Invasion
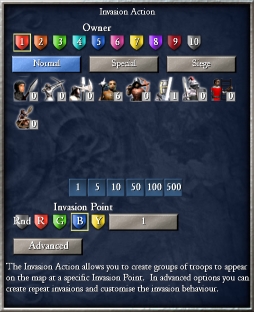
This action will include an invasion on the map when the triggers have been met. There are a number of
things to
setup in this action.
First the owner of the troops which will come on the map must be selecting one of the 10 coloured
flags.
Next the number of troops of each type that will appear with the invasion must be decided. This is done by
clicking the troop icon then increasing or decreasing the number in the corner by using the number buttons
provided (left-click to increase, right-click to decrease by the button amount) or using the mouse wheel
while
hovered above the troop icon. You can find other troop types by clicking on the “Normal”, “special” or
“Siege”
buttons.
Next, an invasion point must be selected, which is where the invasion will appear on the map. This invasion
point
will be one of the waypoint flags placed on the map in the map editor (Section
8/Waypoints).
There is also advanced options to setup if you want to make your invasions more precise.
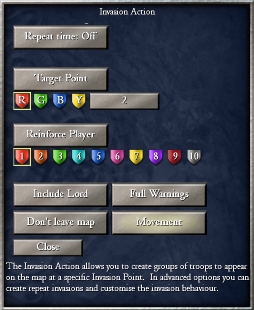
Repeat time can be used to setup the invasion so that it happens numerous times over regular intervals. Click
on
the repeat time button to set how many months between each repetition of the invasion you want to have, or
“Off”
if you only want the invasion to happen once. If the repeat time is set to any number other than “Off” then
you
will need to set how many times it repeats, unless you want to set it to repeat constantly, in which case
set it
to “Infinite”.
The target point is a marker on the map which the invasion will move to or target. This is a waypoint flag
placed
in the Map Editor.
The next is if you want the invasion to be troops which will reinforce a player or attack a player. The player you want to reinforce or attack is selected using the 10 Coloured player shields. If you do not want the invasion to have a dedicated target, click the button until it says “Free AI” meaning it will do as it pleases.
No Lord/Include Lord is whether you want the invasion to come on with the player's Lord or not. (This is not available with Attacking Army/Defensive Army or Vandalize)
Full Warning/No Warnings/Normal Warnings/Early Warnings determines how often you want to display messages to the player warning of the coming invasion from your military commander John Briggs.
Don't Leave Map/Leave Map determines whether the invasion force will always remain on the map until they are killed or if they will leave the map at any point.
Set the Invasion to Movement if you simply want the invasion to move from one point to the other.
Set the Invasion to Siege if you want the invasion to set up a siege camp outside it's enemies castle and
attack
using siege engines.
Set to Defensive Army if you want the invasion troops to defend at the target point.
Set to Attacking Army if you want the invasion troops to attack at the target point.
Set to Vandalize if you want the invasion troops to attacking and disturb the surrounding enemies economy.
The Close button will take you back to the Invasion Action screen.
Play Message
The message action allows you to display an avatar of a game character in game during the mission, display a
text
message and play a speech file.
Click on the top button to scroll through the available avatars to be displayed. (Arthur, Lancelot, Percival, Galahad, Gareth, Gawain, Sir Bedivere, Dietrich, Siegfried, Vlad, Mordred, Merlin, Default Arthurian, Default Ice, Default Evil, Alfred the Great, Beowulf, Hildebrand).
Select the Text file ID by typing it in manually or double clicking on one of the IDs displayed which can be scrolled through using the mouse wheel.
Select the Sound file by typing it in manually.
Note: Sound files are located in the installed directory, in fx\speech and text IDs are located in the en.xml file in the il8n folder of the installed Stronghold Legends folder.
AI Retreat
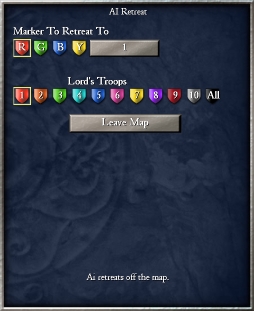
This action is used if you want any AI troops to retreat from attacking.
A marker which you want the AI troops to retreat to can be set using a waypoint marker.
A which lord's troops it is that you want to retreat can be set be selecting one of the coloured player
shields,
or the black “All” shield if you want all troops to retreat.
And a button is available to select whether you want the AI troops to Stay On Map/Leave Map.
Remove Blockages
This will remove any ice blockages (see Section 7) that are placed on the map in the
Map
Editor. There is nothing to setup for this action.
Stop Lord Creation
This action will stop all lords from being created on the map. There is nothing to setup for this action.
This action is meant to be used at the beginning of the map (Date: 0) so that the next action, Character is Lord and Character is AI Lord, can be used to set other characters to be the player or AI's Lord rather than the default Lords (Arthur, Dietrich and Vlad)
Character is Lord
This action is used to set which character will be the person playing the map's Lord. If the character is
already
placed on the map in the human player's colour, then this character will become the Lord, otherwise the
character
will appear as the Lord in front of the keep as normal.
The characters available to make into the Lord are: Sir Bedivere, Lancelot, Gareth, Siegfried, Dwarf, Frost Giant, Sorcerer or Hildebrand.
Character is AI Lord
This action is used to set which character will be the AI's Lord. If the character is already placed on the
map in
the AI player's colour, then this character will become the Lord, otherwise the character will appear as the
Lord
in front of the AI's keep as normal.
The characters available to make into the Lord are: Sir Bedivere, Lancelot, Gareth, Siegfried, Dwarf, Frost Giant, Sorcerer or Hildebrand.
Mini-map Marker
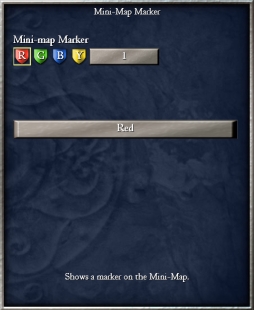
This will create a blinking marker on the player's mini-map in a selected colour.
The position of the marker is chosen using a waypoint flag and the colour of the marker is selected by
clicking on
the large grey button. The colours available are: Red or Green.
Remove Mini-map Marker
This will clear a marker which is already on the mini-map. The mini-map you wish to clear is selected by
choosing
which waypoint flag the marker is appearing at (created using the “Mini-Map marker” action).
Clear Mini-map Markers
This action will clear all mini-map markers that are currently appearing at the time of this action
occurring.
There is nothing to set up for this action.
Kill All Lord's Troops
This action will kill all of a selected Lord's troops once the triggers of the action have been met. The
Lord
whose troops are to be killed is selected by the 10 coloured player shields.
Stop Repeating Invasions
This action will stop any invasions that were set to repeat from repeating once the triggers of the action
have
been met. There is nothing to setup for this action.
The following actions can be set to affect the player's performance in the way described.
Apple Blight Event
This event will kill all the apples in the player's apple orchards. They will have to wait for another full
apple
cycle before they can collect apples again.
Bad Weather Event
This kills all the player's crops meaning that wheat, hops, apples will have to wait a while before they can
begin
production again.
New Bathing System Event
This will give the player a boost in popularity.
Bear Attack Event
This will give the player a decrease in popularity.
Bishop Arrives Event
This gives the player a bonus of honour.
Bumper Harvest Event
Speeds up apple farm, wheat farm and hop farm production.
Mad Cow Disease Event
All the player's cows at their dairy farms will die.
Crime Wave Event
This will cause some of the player's food to disappear form their granary.
Dance Event
This will give the player a bonus of honour.
Random Fire Event
A random fire will appear somewhere in the player's estate.
Gold Find Event
The player will receive some extra gold as a bonus.
Hop Weevil Event
This will cause the player's hops to be killed so hop production will need to begin its cycle from the
beginning.
Jester Arrives Event
This gives the player a bonus of honour.
Jousting Tournament Event
This gives the player a bonus of honour.
Mercenaries Arrive Event
A group of 6 crossbowmen will appear outside the player's keep for him to use.
Outlaws Return Event
A group of 10 Outlaws will appear outside the user's keep for him to use.
Peasants Revolt Event
Some of the player's peasants will turn into Outlaws and attack the player's peasants and buildings.
Rabbit Invasion Event
This kills all the player's crops meaning that wheat, hops, apples will have to wait a while before they can
begin
production again.
Rat Plague Event
This will give the player a decrease in popularity.
Small Pox Event
Some of the player's peasants will die from Small Pox.
Swine Fever Event
All of the pigs at the player's pig farms will die.
Travelling Fair Event
This gives the player a boost in popularity.
Vine Wither Event
All the player's grape vines will die, slowing down Wine production.
Wheat Rust Event
All the player's wheat crops die slowing down production.
Witchcraft Event
This gives the player a negative dent in their popularity.
Wolf Invasion Event
Some wild wolves will appear in the player's estate and begin to attack the peasants and troops.
Best of luck to all you map designers and happy map making!
The Stronghold Legends map editor tool is unsupported and provided for use in its given
state.
© 2007 Firefly Studios, Ltd. Stronghold Legends, Firefly Studios and the Firefly Studios logo are
trademarks
of Firefly Studios.