MAP EDITOR
Written and compiled by
Stephen Pomphrey
- Index
- Introduction
- How to Create a Map
- Adding a New Map
- Adding an Empire Level
- Editing the Land
- The Event Editor
- Altering Start Up Conditions
2. INTRODUCTION
Welcome to the CivCity Map editor guide!
The editor for civcity Rome is an extremely powerful tool, allowing you to create your very own maps and scenarios for the game.
Although the editor has been designed to be as friendly as possible, it can take some time and practice to fully appreciate all the controls, and to see exactly what it can do. This guide should help lead you through all the steps of creating a map, and be a reference book while you do so.
3. HOW TO CREATE A MAP
Regardless of what sort of map you are trying to create, there are 5 basic steps you will work through, which are
-
• Adding a new map
• adding an empire level
• Editing the land
• setting win/lose conditions
• adding events (optional)
• ALTERING THE STARTING CONDITIONS
Each stage will be discussed in this order in this guide.
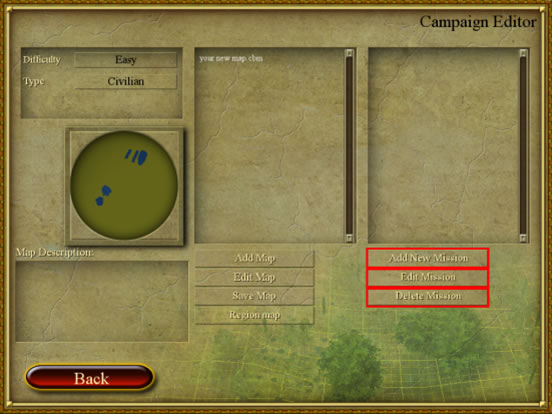
4. ADDING A NEW MAP
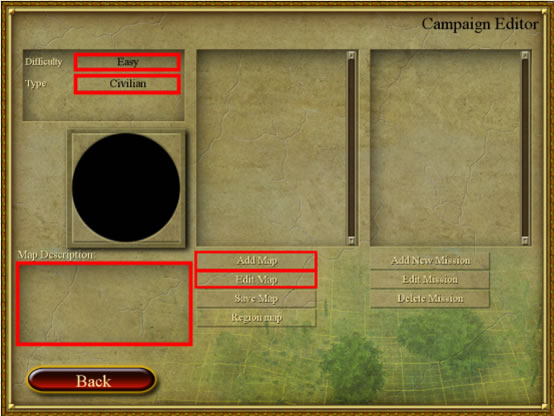
To begin a new map, click the “add map” icon. After naming the
map, you can choose the difficulty level and type of map you are creating. Clicking
on the highlighted buttons will cycle through the various options you have.
You can choose 'easy' 'medium' and 'hard'
difficulty. (these are described in the main manual.)
You can select 'civilian' 'military' and 'freebuild'
types of map. Selecting the correct type of map will organise your maps, as
they can be filtered by map type.
You can also add in a map description by clicking the highlighted area and
typing it in.
Once you are ready to begin designing your map, click “edit map”.
This will launch the editing screen.
5. ADDING AN EMPIRE LEVEL
Before you build a map, you have to decide where in the empire your city is going to be placed. The editor has a selection of pre-chosen locations around the Roman Empire that you can select.
Clicking on the “region map” button will bring up the selection. Clicking “load” will show you all the possible preset locations. Select one and open it up; you will see something like the screenshot below. (“great Britain 2” in this case)

Knowing what can be traded allows you to add challenges to your map; for example, if a trade city sells wheat, you could prevent your own city from growing it and force the player to trade instead.
The first time you explore the empire section, it might be worth loading all
of them in turn to give you an idea of the choices available. Some have enemy
towns nearby, some have limited trading partners.
Once you have chosen, click “done”.
It is best to select the Empire level early on in your map design for several
reasons;
• If your chosen location has a trading city overseas, you will require
to build sea access into your map.
• Although you can set your land traders can travel to any edge of your
map, it makes much more sense to direct them in the direction of a trade city.
(traders must physically leave your map by walking to a pre-placed marker, but
you decide where it is located).Planning this at an early stage can prevent
the trader being blocked by land or sea obstacles.
• By know ing the geography of the area before starting your map, you
can design it to fit in properly; coastlines and mountains in the correct place,
access to fishing and specific forms of farming etc.
6. EDITING THE LAND
This is where you can alter almost all the physical characteristics of your map. There are various menus and icons described below that allow you to do this.
6.1 Editing Panel
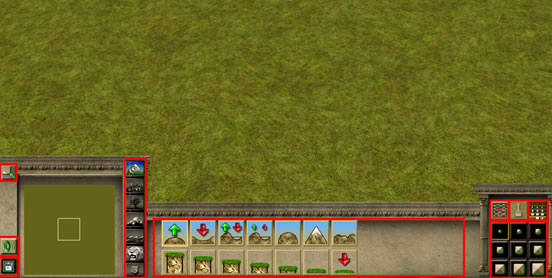
![]() - this
icon allows you to resize your map from large to small
- this
icon allows you to resize your map from large to small
![]() - this icon
will bring up the sound effect menu, allowing you to add sounds to certain areas
of your map.
- this icon
will bring up the sound effect menu, allowing you to add sounds to certain areas
of your map.
![]() - this
icon will take you back to the main menu.
- this
icon will take you back to the main menu.
![]() Clicking
on these icons will bring up various menus within the editor. They are described
in more detail later in the guide.
Clicking
on these icons will bring up various menus within the editor. They are described
in more detail later in the guide.
This bar shows the tools available in each different menu. You can change these by selecting another menu icon.
![]() - this
icon turns grid lines for the map on and off.
- this
icon turns grid lines for the map on and off.
![]() - delete icon.
- delete icon.
![]() - this icon varies the size or
height of various objects such as trees, depending
which layer you select. The top layer is smallest and they increase in size
towards the bottom. The last layer selects a random setting.
- this icon varies the size or
height of various objects such as trees, depending
which layer you select. The top layer is smallest and they increase in size
towards the bottom. The last layer selects a random setting.
 - these icons allow you to choose the size of your cursor.
HINTS
It is worth bearing in mind afew points when creating a map from scratch -
• Remember that more advanced houses require fresh water to upgrade, so
you will need to provide a river. (seawater is not suitable).
• Remember to place resources such as wood, iron or marble on the map
and ensure the land is accessible.
• You cannot place buildings on very uneven land, so make sure you leave
enough flat land for building.
• Remember about your location within the empire. Matching features from
the empire level with your map will greatly improve it, and make trading much
easier.
6.2 Editing tools
All these tools work in a similar fashion. You select the icon of the tool you wish to use, then apply it to your map by clicking the appropriate location. Some tools allow you to 'paint' your effect onto the map by clicking and holding the mouse button while moving the mouse.
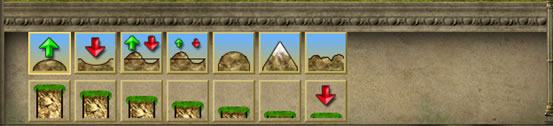
![]() 1. Land
Height menu
1. Land
Height menu
Use these tools to alter the height of the land on your map. Remember that
by choosing a different mouse pointer size, you can affect more or less land.
(see section 5.1)
From left to right these icons are-
• Raise land
• Lower land
• Level uneven land
• Smooth uneven land
• Raise rounded piece of land
• Raise sharp mountain
• Raise small hills
The bottom row will paint land of a specific height onto the map, from the tallest possible on the left, to the lowest on the right. These tools allow you to create solid cliff walls rather than rounded hills, and can help you quickly raise large sections of land to a specific height.
![]() 2.
Land textures menu
2.
Land textures menu
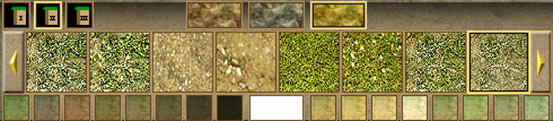
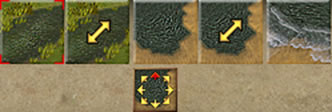
These tools allow you to paint different textures onto the land, such as grassland, sandy shores and stony uplands. Clicking left and right will bring up further choices for you to use.
Selecting one of the three icons above the main row will alter the colours
of the Tiles below.
Selecting any of the various colour choices below the main row will allow you
to paint a tint OVER the existing tiles on the map.
Using these tools in combination can create almost any landscape imaginable, and offers near limitless choice of colour and texture.
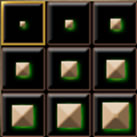
![]() - this
icon allows you to select one of three preset colours for cliff faces.
- this
icon allows you to select one of three preset colours for cliff faces.
![]() 3.
Trees and plants
3.
Trees and plants
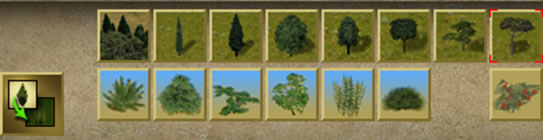
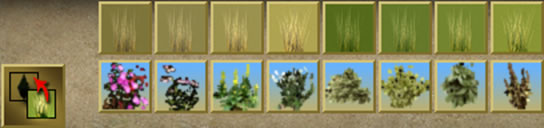
These tools simply allow you to place various trees and plants on your map. You can vary the height of the trees by selecting the appropriate height icon (see section 5.1)
 This
icon swaps to the plant menu. Clicking it again will return the tree menu.
This
icon swaps to the plant menu. Clicking it again will return the tree menu.
![]() 4. Resources
4. Resources
These tools allow you to place special resources on your map. They are, from
left to right, marble, iron and stone.
These must be placed if you want these resources available to your city, and
require special buildings to be placed to gather them so the land must be flat.
![]() 5. Sea and Rivers
5. Sea and Rivers
These tools allow you to add rivers and sea to your map. From the left the
icons are:
• Adding rivers. Simply paint the river onto the map. The water will flow
in the direction of the mouse as it is placed.
• Water flow (river) - This tool is used to alter the flow direction of a river that is already placed. Again, simply paint over the river in the direction you wish the water to move.
• Adding Sea - Simply paint sea onto your map. The sea will flow in the same direction only no matter which way you paint it on. You can choose this direction before painting by clicking the direction arrow icon below until it faces the desired direction.
• Water Flow (sea) - This tool alters the flow direction of sea that is already placed. Simply paint over the sea in the direction you wish the water to flow.
• Wave tool - you can add in waves breaking on shore with this tool. Simply select the tool and hover it over an area of sea meeting land. It will automatically aim itself so the waves break onto the land.
![]() 6.
Animals
6.
Animals
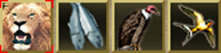
These tools allow you to add wild animals to your map.
IMPORTANT - remember to select the smallest cursor size before placing
animals so you place only one animal at a time!
From left to right, you can place lions, fish, vultures and birds.
Note that fish must be placed in water, and that placing vultures adds a tree
to the landscape that they sit upon.
![]() 7. Event and trade tools
7. Event and trade tools
![]() The
leftmost icon is the Fire event. Clicking this icon and clicking on the map
places it. If you then rotate your mouse wheel (or use the R & F keys),
you can change the direction the fire is going to spread. Each fire is assigned
a number so that you can set up each event to begin at a certain time or repeat
at set intervals. This is covered in “actions” in section 7.4.
The
leftmost icon is the Fire event. Clicking this icon and clicking on the map
places it. If you then rotate your mouse wheel (or use the R & F keys),
you can change the direction the fire is going to spread. Each fire is assigned
a number so that you can set up each event to begin at a certain time or repeat
at set intervals. This is covered in “actions” in section 7.4.
![]() The
next icon is the target for your army to leave the map and go to the Empire
level. You select an area close to the edge of your map and place it.
The
next icon is the target for your army to leave the map and go to the Empire
level. You select an area close to the edge of your map and place it.
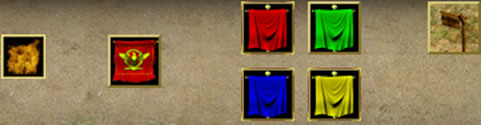
 These
icons allow you to locate the starting points for various events set in the
events section (see section 7.2). Each colour flag allows you to place up to
8 markers, so you can have 32 separate markers per map!
These
icons allow you to locate the starting points for various events set in the
events section (see section 7.2). Each colour flag allows you to place up to
8 markers, so you can have 32 separate markers per map!
Clicking a coloured flag then the map will place the first flag, numbered 1.
each subsequent click will add the next numbered flag until 8 is reached.
You can set start points, targets for events, locations invading troops will
attack towards and many more. All you need to do is remember the colour and
number for each point you set, and hook it up to the correct event.
![]() The final icon is the trade
tool, that sets the destination for your mule
trains or trade ships when they travel to distant cities. If you want both land
and sea trade, you must click this tool on both land and sea. This will place
a flag target (LAND) or an anchor (SEA).
The final icon is the trade
tool, that sets the destination for your mule
trains or trade ships when they travel to distant cities. If you want both land
and sea trade, you must click this tool on both land and sea. This will place
a flag target (LAND) or an anchor (SEA).
7. THE EVENT EDITOR
Once you have completed your map design and added in the empire level, it is time to set the conditions for the map. Stricly speaking, you do not have to set any conditions for your map at all. If you simply wish to enjoy building a city on your custom designed map, then do not set any win conditions so the game will not end prematurely for you. In our own 'freebuild' maps, they are often given a lose condition of using up 3 loans; this is simply to give access to the loans for the freebuilder to use so that money is not an obstacle to the perfect city!
Lets examine the editor screens that allows us to do this.
1.To add any new events or conditions to your map, you must always start the same way, by clicking “ADD NEW MISSION”. This will add “mission 1” into the box above.
2 click on “EDIT MISSION”. Mission 1 is automatically highlighted as it's the only one available. This brings up the mission creation screen. (NB - You will never need to have more than one mission here. Additional missions will not have any effect on your game).
7.1 Mission Creation
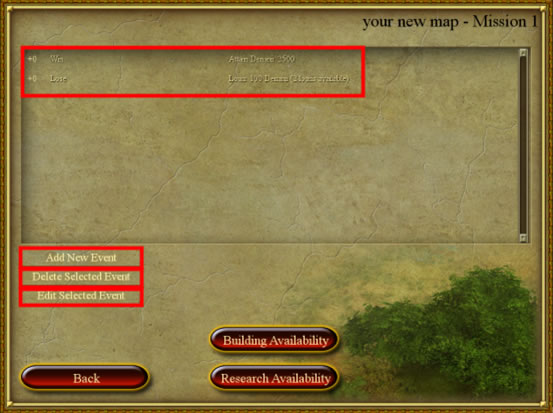
This is where you can add/remove or edit events for your map. The buttons for
these processes are self explanatory and are shown above. Clicking 'add
new event' or 'edit selected event' brings up the 'event
editor' screen. (Section 7.1)
In this example, two events have already been added; a win and a lose condition.
All events that you create are listed in the top window.
You can select which items of research can be carried out, and which buildings are available to place by using the 'building' and 'research availability' buttons shown. They open the pages shown below.
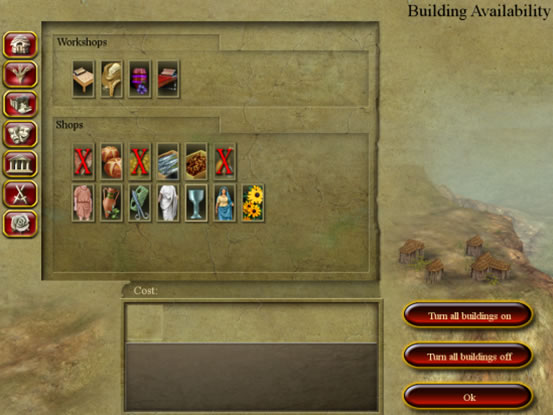
To select which buildings to turn off, simply click on an icon to open up those buildings, and click on the building to turn it off/on. A Red X appears on buildings that are not available.
The research availability screen works in a similar fashion; clicking on some research will switch between allowing and disallowing it in your map. Remember that if you turn off a piece of research, all subsequent research on the tree is also turned off.
7.2 Event Editor
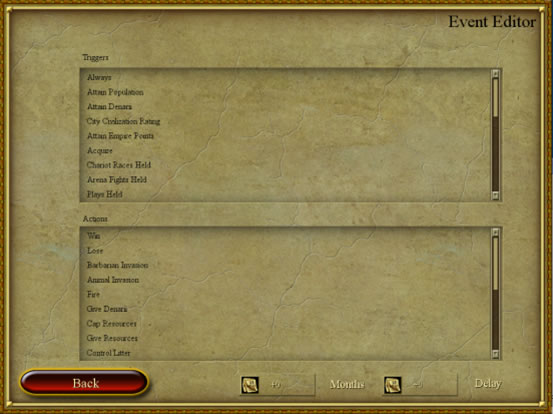
This is the most powerful part of the editor- here you can create conditions for winning or losing, set invasions by enemy troops, trigger natural disasters and then link them to almost any trigger you could imagine.
Although this guide will explain the workings of all these features, the combinations achievable are almost without limit - it will take some time to even try all the features listed!
All events work in a similar way, as they all have a trigger that sets off an action. You have to select at least one of each to have a valid action.
For example, if you want to have a barbarian invasion to occur when your population reaches 2000, you would select the “attain population” trigger, select 2000, then click on the “barbarian invasion” action below.
The real power of the editor is linking several triggers to an action, or linking several actions to a trigger. In the above example, you could add in a second trigger that also must be completed before the invasion occurs, or perhaps you could add in an animal invasion afew months after the barbarians strike! The combinations possible are almost limitless.
![]()
These icons vary the timing of various events. They are adjusted by the mouse
button (or the R&F keys) to add or remove months. The first selects how
many months pass from the start of the game before the specified event occurs.
The second (delay) adds a delay between the trigger and the action.
7.3 Triggers
Almost all triggers in the game operate in the same way. You click on the trigger and this brings up a menu allowing you to select exactly what criteria need to be met.
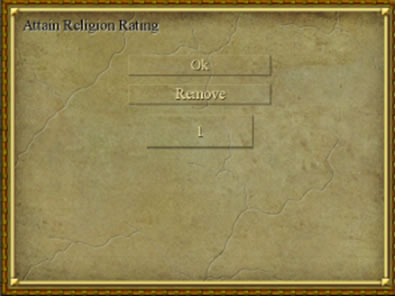
The mouse wheel ( or the R&F keys) will change the amount of, in this case, religion required in your city to activate the trigger.
Special triggers
Always
this is a special feature. It allows win or lose conditions to become 'time
until victory' conditions. Clicking on win/lose and then on 'always'
will switch between the two. Add the number of months until victory/defeat that
you require.
Aquire/Goods sold/Goods to rome triggers
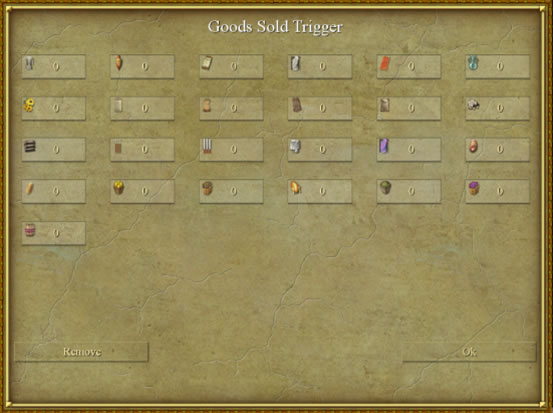
Several triggers use this style interface to determine what goods need to be
accumulated, bought or sold. This is simply done by scrolling the mouse (or
using the R&F keys) over the numbers below the required good, and selecting
the required number.
loans
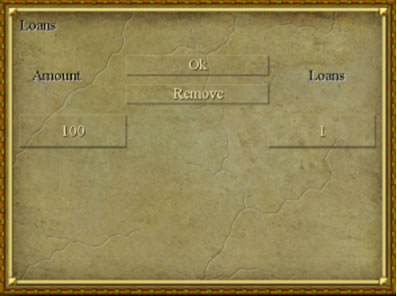
Loan triggers are frequently used, and are simple to set up. Simply select the amount of denarii to be loaned (using mousewheel or the R&T keys), and select the number of loans available (maximum of 3).
Buildings built/buildings destroyed
These triggers need you to first select the building name by scrolling the mouse
(or using the R&F keys) while the mouse is over the empty text box. This
will scroll all the buildings available in the game. Simply select the number
of buildings required to finish.
7.4 Actions
Win
The simplest and most important of all triggers. Select a trigger and click
on 'win'; once this trigger is achieved, you win the game! You can
set multiple win conditions that all must be achieved to win the game
Lose
The simplest and most important of all triggers. Select a trigger and click
on 'lose'; if this trigger is achieved, you lose the game. You can
set multiple lose conditions any of which will lose the game if met.
Barbarian invasion
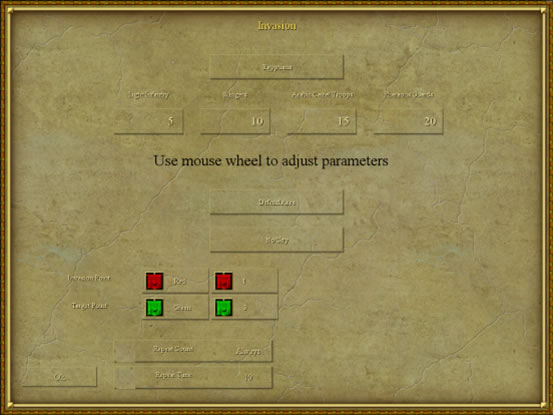
This powerful tool lets you set enemy attacks to appear on your map.
NOTE - You must remember to load an empire level map that HAS ENEMY CITIES available.
Before you start setting parameters here, you must set up your map properly.
You must place some target flags in the map editor to locate the starting points
for the invasions, and if required, flags to send the enemy troops to (see section
6.2). All invasions can start at the same point, or you can have several different
ones placed around the map. Consider having invasions arrive on the same side
of the map as the invasion will approach on the Empire map.
All the buttons on this screen are changed by using the mouse wheel or the R&F buttons to scroll through the available options.
From top to bottom the buttons are-
Enemy type-scroll through the different nationality enemies you can face.
Enemy composition - the next layer of buttons let you select exactly how
many of each troop type will attack.
Enemy orders- select how the troops will act when attacking. Choose from 'harass
city' 'storm city' and 'defend area'.
Enemy home city - Choose where the enemy troops appear on the empire level.
(cycles through all available choices)
Invasion point - select the correctly coloured and numbered flag marker
for the invasion here. If you leave it as 'any', the invasions will
randomly appear at any target flag on the map.
The first button selects the colour, the second changes the number.
Target point - if you wish to do so, you can set a target for the invasion to head for. Scroll the buttons to the correct coloured and numbered flag.
Repeat count - This sets how many invasions will appear.the default for this is 'off', until you change the repeat time setting. If the time is set, then you can choose to have the invasion to appear a certain number of times, or set to 'always' so the invasion will repeat endlessly.
Repeat time - This sets the number of months between each repeat of the invasion.
Animal invasion
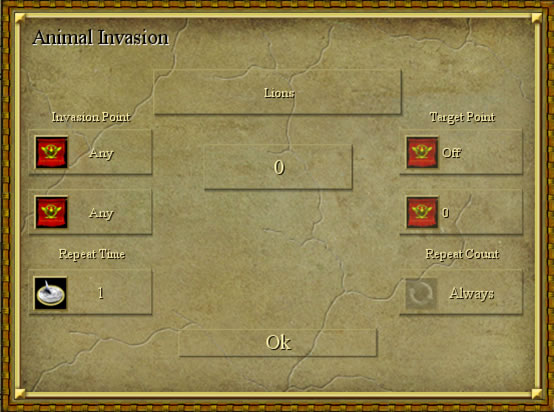
Animal invasions are set up in a similar way to barbarian invasions. You must set target flags on the map itself to determine where the invasions will begin, and where they will move to if required.
See barbarian invasion for details on the settings available.
Fire
The fire action triggers a blaze to occur at a preplaced marker on your map,
and spread in a specific direction. (Section 5.2 7 for details on the map marker).
If you have several fire markers set on the map, you can select which specific
fire this event deals with. (scrolling the top button selects which number)
You can set how often the fire occurs, and the number of months between each
event.
Give denarii
Simply scroll the button to select the amount of money to be given to the player
when the trigger is activated.
Cap resources
Give resources
This allows you to give the player goods once a trigger has been achieved. Simply
scroll the figures under the items to determine the number given.
Control litter
Not strictly speaking an action, this allows you to turn off the effects of
litter on your city. Simply set the trigger to 'always' for your
choice to affect your map.
Set denarii
Not strictly speaking an action, this allows you to set the starting money for
your map. Simply scroll the window to change the figure.
Add empire request
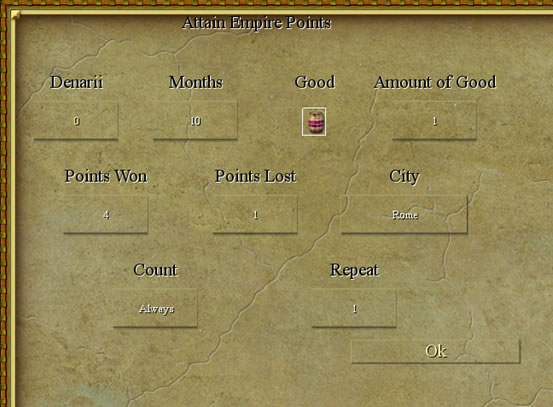
This activates an empire request, a demand from somewhere in the empire that
you deliver certain goods to them.
Months - Set the time that the player has to complete the order in the 'months'
window.
Good - scroll in this window to cycle through all possible goods for delivery.
Select the one you wish to be delivered.
Amount of good - simply the number required to meet the delivery.
Points won/lost - This determines how many empire level points you will gain/lose if you successfully/unsuccessfully complete the order. Set by scrolling the windows.
City - set which city is demanding the goods.
Count and repeat - set if you wish to have the request repeated in your game, and if so, how many months will separate each one.
Activate city
Not strictly a trigger for an event, this allows you to remove cities from your
empire level should you choose to. Scroll through the available cities and select
'deactivate' to turn it off.
Set date
Simply allows you to set the start date for your map. Scroll the windows to
change the settings.
Random fire
Random fires are much simpler to set up than a normal fire; you do not have
to set any start points or directions. Simply select how many random fires you
would like to start when this is triggered, and (should you wish to), how often
these random fires will re-occur.
Flood
The flood event will trigger heavy rains over your map, that will clean the
streets of rubbish. Simply click on it and set the monthly delay till it occurs.
Quake
This will trigger a devasting earthquake at the location you choose on the map.
You must have placed a marker flag in the map editor. Select the number of buildings
that will be destroyed, the flag colour and number where it will occur, and
whether it is to be repeated.
Control Fire
This switches on/off the need to guard against fires in your city. With this
turned off, you need not provide watchtower coverage to prevent fires breaking
out in your city. Select this, and select 'always'.
Control riots
This switches on/off the need to guard against rioting in your city. With this
turned off, you need not provide guardtower coverage to prevent riots breaking
out in your city. Select this, and select 'always'.
Set happiness
This allows you to set the starting happiness of your map. Simply scroll the
number until it is the desired level(0-100).
8 ALTERING STARTUP CONDITIONS
Once you have created your map, set the win/lose conditions, added events to your satisfaction, all that remains is to set the starting conditions for your map. This covers things like how much money you have to begin with, what cities are available on your empire level, what date the map begins with, and your starting happiness.
Each of these can be done by adding a special 'action' in the event editor and the method for each is covered in Section 7.4. This is simply to draw your attention to what can be altered should you wish to.
Here is a quick checklist you may like to work through.
Do you-
want to add/remove a city from the empire level.
-use the 'activate city' action
want to change the starting money for your map.
-use the 'set denarii' action
want to turn off litter on your map.
-use the 'control litter' action
Want to turn Fire and riots on or off?
-use the 'control fire' or 'control riots' action.
NB - unless you choose the hard setting for your map, riot and fires will
not affect your map anyway.
Want to change the date for the map?
-use the 'set date' action
Wish to alter the starting happiness for your map?
- use the 'set happiness' action